Restaurant-style egg biryani made in pressure cooker using basic everyday ingredients like rice, eggs, yogurt, spices, and masala. Step by Step method for a perfect Mughlai Egg Biryani with serving suggestions.

Restaurant Style Pressure Cooker Mughlai Egg Biryani
This weekend I made my family’s favorite ‘Restaurant Style Egg Biryani’ which everyone also calls ‘Pressure Cooker Egg Biryani or Mughlai Egg Biryani too.
These days it’s so tough to decide which day of the week it is and hence we miscalculated and were left with only ‘eggs’ in our kitchen pantry.And I was in no mood to have another and paratha or giant scramble or something of those sorts.
Hence, a spicy, fragrant and fingerpicking egg biryani was a perfect solution !!!
Now as many of you might have noticed, all my biryani recipes are inspired more by Mughlai Cuisine, hence my Egg Biryani is no different and has an abundance of Mughlai Flavors like cardamom, rose water, saffron, etc
In this recipe, you’ll find step by step method to make a perfect biryani everytime and this can be stored for 2-3 days in the fridge in an airtight container.
Restaurant Style Pressure Cooker Egg Biryani Ingredients:
For Cooking the Rice:
- 2 Cups Basmati Rice
- 5 Cups Water – to make the rice
- 1/2 Tsp Salt
- 4 Cloves
- 2 Dry Bay Leaf (Tej Patta)
Other Biryani Ingredients:
- 4 Medium Red Onion – thinly sliced
- 4 Tbsp Oil – to fry onion
- 2 Tbsp Flour – for crisping biryani
- 1 Tbsp Ginger Paste
- 1 Tbsp Garlic Paste
- 2 Tbsp Chopped Almonds – optional
- 1 Cup Plain Yogurt
- 1/2 Cup Water
- 10 Fresh Mint Leaves
- 4 Tbsp Olive Oil – to make masala
- 4 Tbsp Ghee
- 1 Tsp Rose Water – optional
- Few Strands of Saffron – optional
- 3 Tbsp Milk – to soak the saffron – optional
Whole Spices:
- 1 Cinnamon Stick – broken into 2-3 pieces
- 1 Bay Leaf
- 3 Black Cardamom
- 6 Green Cardamom
- 4 Cloves
- Pinch of Nutmeg
Powdered Spices:
- 1/4 Tsp Black Pepper Powder
- 1 Tbsp Coriander Powder
- 1 Tbsp Cumin Powder
- 2 Tbsp Garam Masala
- 1/2 Tsp Turmeric – optional
- 1 Tsp Kashmiri Red Chili Powder – optional
- Salt – as per taste

Restaurant Style Pressure Cooker Egg Biryani Process:
Cooking the Rice:
- Heat 5 cups water In a large pot.
- Once the water starts to boil, add rice, salt, bay leaf, and cloves.
- Stir everything snd let this simmer on low-medium heat for 17 minutes.
- Check rice after 17 minutes, it should have cooked 90% hence turn off the heat.
- Strain the rice of water and keep aside.

Basmati Rice for Biryani
Cooking the Eggs:
- Place 6 eggs In a large bowl and sprinkle red chili powder, turmeric, and salt.
- Coat the eggs with the above spices and keep aside.
- Heat 1 tsp oil in a large non-stick pressure cooker (I’m using 7-liter pressure cooker).
- Add the eggs and saute for 2 minutes on low flames.
- Once the eggs start to blister and brown on each side, turn off the heat.
- Remove the eggs and keep aside.

Frying the Onions:
- Place 6 eggs In a large bowl and sprinkle red chili powder, turmeric, and salt.
- Coat the eggs with the above spices and keep aside.
- In the same pressure cooker, add 3 tbsp oil and 4 tbsp of chopped onion mixture.
- Saute on low-medium flame till onion turns brownish pink and crisp up.
- Remove from the cooker and keep on paper towel/plate.
- Similarly, fry all the onions and keep aside.

Fried Onion for Biryani – Birista
Making the Egg Biryani Recipe:
- In the same pressure cooker, heat 3 tbsp oil + 2 tbsp ghee.
- Add all the crushed whole spices and saute for a minute.
- Add ginger + garlic paste, all powdered spices and saute on medium heat till they turn golden in color (about 2 minutes).
- Now add fried onions and saute.
- Add yogurt, water, and cover cook for another 2 minutes.
- Now add fried eggs and let everything simmer for 2 minutes. Then turn off the heat.
- Remove eggs separately in a bowl and remove the cooked masala in a separate bowl. (Leave the pressure cooker as is for further use).

Layer the Egg Biryani in Pressure Cooker:
- In the same pressure cooker, place 2 ladles of cooked rice, sprinkle 2tbsp of cooked masala, add 2 tbsp of fried onions, chopped cilantro+mint, 1 or 2 fried eggs and sprinkle color if using. (picture below)
- Layer 2 ladles of rice and follow the process above.
- Repeat the process till you reach the top of the dish.
- Now add remaining fried eggs, fried onion, masala and cilantro+mint, 2 tbsp ghee (all remaining ingredients).
- OPTIONAL: add rose water and saffron soaked in milk.
- Cover the pressure cooker and let cook for 2 minutes on medium flames.
- Turn off the heat and wait for 5 minutes.
- Fluff the biryani using a big fork (scoop and mix the rice and egg layers).
- The biryani is ready to serve now.


Egg Biryani Pressure Cooker
Mughlai Egg Biryani Serving Suggestion:
- Serve Fresh with choice of pickle/curry/pappadam or yogurt dip.
- You can even serve this with a simple cucumber-tomato salad

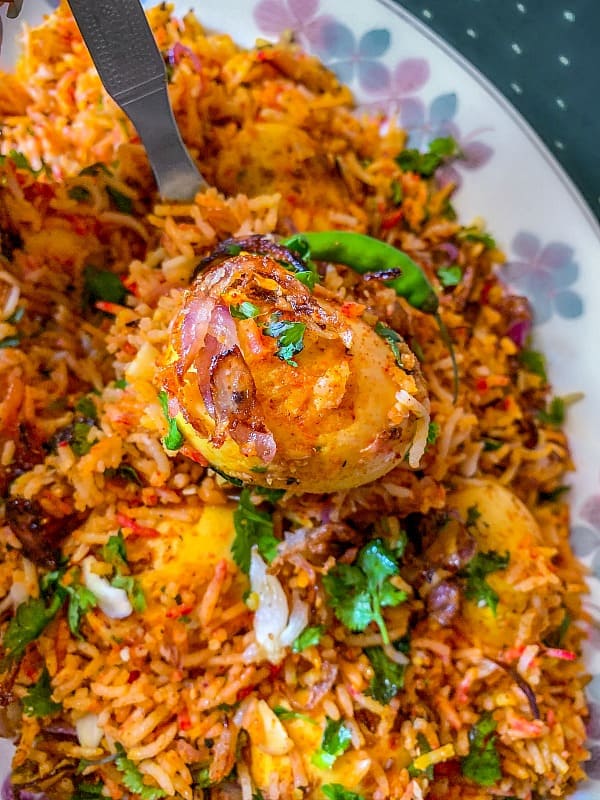
Mughlai Egg Biryani

————————
Tried Our Recipe – AWESOME!!!
Now Quickly SNAP A PICTURE & TAG :
#easycookingwithmolly + @easycookingwithmolly on Instagram –>
Connect with Me Here: Facebook / Pinterest / Instagram
:: You May Also Like ::
Quick Kathal Biryani Recipe – Jackfruit Biryani (Pressure Cooker)
How To Make Quick Restaurant Style Vegetable Biryani
Restaurant Style Pressure Cooker Egg Biryani - Mughlai Egg Biryani

Restaurant-style egg biryani made in pressure cooker using basic everyday ingredients like rice, eggs, yogurt, spices and masala. Also known as Mughlai Egg Biryani.
Ingredients
For Cooking the Rice:
- 2 Cups Basmati Rice
- 5 Cups Water - to make the rice
- 1 Tsp Salt
- 4 Cloves
- 2 Dry Bay Leaf (Tej Patta)
Other Biryani Ingredients:
- 4 Medium Red Onion - thinly chopped
- 4 Tbsp Oil - to fry onion
- 2 Tbsp Flour - for crisping biryani
- 1 Tbsp Ginger Paste
- 1 Tbsp Garlic Paste
- 2 Tbsp Chopped Almonds - optional
- 1 Cup Plain Yogurt
- 1/2 Cup Water
- 10 Fresh Mint Leaves
- 4 Tbsp Olive Oil - to make masala
- 4 Tbsp Ghee
- 1 Tsp Rose Water - optional
- Few Strands of Saffron - optional
- 3 Tbsp Milk - to soak the saffron - optional
Whole Spices:
- 1 Cinnamon Stick - broken into 2-3 pieces
- 1 Bay Leaf
- 3 Black Cardamom
- 6 Green Cardamom
- 4 Cloves
Powdered Spices
- Pinch of Nutmeg
- 1/2 Tsp Black Pepper Powder
- 2 Tbsp Coriander Powder
- 2 Tbsp Cumin Powder
- 2 Tbsp Garam Masala
- 1/2 Tsp Turmeric - optional
- 1 Tsp Kashmiri Red Chili Powder - optional
- Salt - as per taste
Instructions
Cooking the Rice:
- Heat 5 cups water In a large pot.
- Once the water starts to boil, add rice, salt, bay leaf, and cloves.
- Stir everything snd let this simmer on low-medium heat for 17 minutes.
- Check rice after 17 minutes, it should have cooked 90% hence turn off the heat.
- Strain the rice of water and keep aside.
Cooking the Eggs:
- Place 6 eggs In a large bowl and sprinkle red chili powder, turmeric, and salt.
- Coat the eggs with the above spices and keep aside.
- Heat 1 tsp oil in a large non-stick pressure cooker (I’m using a 7-liter pressure cooker).
- Add the eggs and saute for 2 minutes on low flames.
- Once the eggs start to blister and brown on each side, turn off the heat.
- Remove the eggs and keep aside.
Frying the Onions:
- In a large plate, add thinly sliced onions, 1 tsp oil, and flour. Mix everything (lightly coat onions with flour for extra crispiness).
- In the same pressure cooker, add 3 tbsp oil and 4 tbsp of coated onion mixture.
- Saute on low-medium flame till onion turns brownish pink and crisp up.
- Remove from the cooker and keep on paper towel/plate.
- Similarly, fry all the onions and keep aside.
Making the Egg Biryani:
- In the same pressure cooker, heat 3 tbsp oil + 2 tbsp ghee.
- Add all the crushed whole spices and saute for a minute.
- Add ginger + garlic paste, all powdered spices and saute on medium heat till they turn golden in color (about 2 minutes).
- Now add fried onions and saute.
- Add yogurt, water, and cover cook for another 2 minutes.
- Now add fried eggs and let everything simmer for 2 minutes. Then turn off the heat.
- Remove eggs separately in a bowl and remove the cooked masala in a separate bowl. (Leave the pressure cooker as is for further use).
Layer the Egg Biryani in Pressure Cooker:
- In the same pressure cooker, place 2 ladles of cooked rice, sprinkle 2tbsp of cooked masala, add 2 tbsp of fried onions, chopped cilantro+mint, 1 or 2 fried eggs and sprinkle color if using.
- Layer 2 ladles of rice and follow the process above.
- Repeat the process until you reach the top of the dish.
- Now add remaining fried eggs, fried onion, masala and cilantro+mint, 2 tbsp ghee (all remaining ingredients).
- OPTIONAL: add rose water and saffron soaked in milk.
- Cover the pressure cooker and let cook for 2 minutes on medium flames.
- Turn off the heat and wait for 5 minutes.
- Fluff the biryani using a big fork (scoop and mix the rice and egg layers).
- The biryani is ready to serve now.
Notes
Basmati Rice - you may use any other rice too
Medium Red Onion - you can use white or yellow onion too.
Ghee - for sauteeing masala and drizzling on top
Kashmiri Red Chili Powder - you may use any red chili powder
Rose Water - optional but gives a sweet-cool fragrance to the biryani.
Nutrition Information:
Yield:
4Serving Size:
1Amount Per Serving: Calories: 800Total Fat: 50gSaturated Fat: 15gTrans Fat: 0gUnsaturated Fat: 40gCholesterol: 49mgSodium: 248mgCarbohydrates: 92gFiber: 12gSugar: 13gProtein: 19g
15 Replies to "Restaurant Style Pressure Cooker Egg Biryani - Mughlai Egg Biryani"
Shraddha Salvi May 17, 2020 (7:06 am)
Hi Molly,
Shraddha here again.. I’ve bookmarked this recipe and was thinking if i can replace eggs with chicken for mughlai chicken biryani. If so, what should be the quantity of chicken used for 3 cups of uncooked rice.
Molly Kumar May 20, 2020 (4:50 am)
Hello Shraddha, yes you can replace the eggs with chicken. You can use 4-6 chicken drumsticks or 3 chicken breasts or 750 gms whole chicken for 3 cups rice. Thanks, Molly
Shraddha Salvi May 8, 2020 (6:12 am)
This recipe is awesome! Can’t thank you enough! M having it now while typing this message ..and i love it!
Molly Kumar May 8, 2020 (6:54 am)
Hello Shraddha, thank you so much for your sweet message and I’m so happy that you liked it. Thanks, Molly
Anagha Suri April 12, 2020 (2:29 pm)
Hello Molly, we made the egg biryani for Sunday brunch and everyone loved it, especially my 6 year old son. He made us save some for tomorrow lunch. Thank you for such a delicious recipe – Anagha
Molly Kumar April 13, 2020 (2:14 pm)
Hello Anagha, thank you so much for your sweet message and I’m so glad you all liked the egg biryani especially the little one 🙂 Hugs, Molly
Natalie April 9, 2020 (11:12 am)
What a lovely recipe. What delicious flavors. I must give this a try soon. Can’t wait to serve this to my family too.
Molly Kumar April 19, 2020 (4:32 am)
Thanks and looking forward to you making it soon.
Leslie April 8, 2020 (6:05 pm)
I can’t get over how satisfying this recipe looks! You have some great flavors combined with this recipe!
Molly Kumar April 19, 2020 (4:31 am)
Thank You 🙂
Pavani April 8, 2020 (12:28 am)
I LOVE biryani and your Mughlai egg biryani is literally calling my name. It looks soo inviting and must have tasted heavenly with all the spices. Yumm!!
Molly Kumar April 8, 2020 (5:57 am)
Hello Pavani, Thanks for your sweet message and hope you try the Mughlai Egg Biryani soon, definitely one of our favorite 🙂 Hugs, Molly
Simmy May 30, 2020 (2:08 pm)
Well for all those who are reading this, i must tell you all that writing a comment is a big task for me. After trying the Egg Biryani recipe yesterday i couldn’t hold myself. Molly thanks for letting me cook something so special. You are awesome. Keep cooking and keep sharing. Yummmmm
Molly Kumar May 31, 2020 (5:44 pm)
Hello Simmy, thank you so much for making my recipe and thanks for finding time to send me your sweet message. I’m so touched and you literally made my week 🙂 – hugs, Molly
Tanman April 6, 2020 (4:32 pm)
Sooooo yummmy and literally makes me wanna grab some of the screen. Saving the recipe to try tomorrow – Thanks